Top 5 Homemade Treats and Dog Toys for Powerful Chewers
Continuing Sarah’s guest post. Part One was yesterday.
ooOOoo
Here Are Some Heavy Duty Dog Toys You Can Make Yourself
#1: “Indestructible Dog Toy (Made with Dried Sweet Potato)
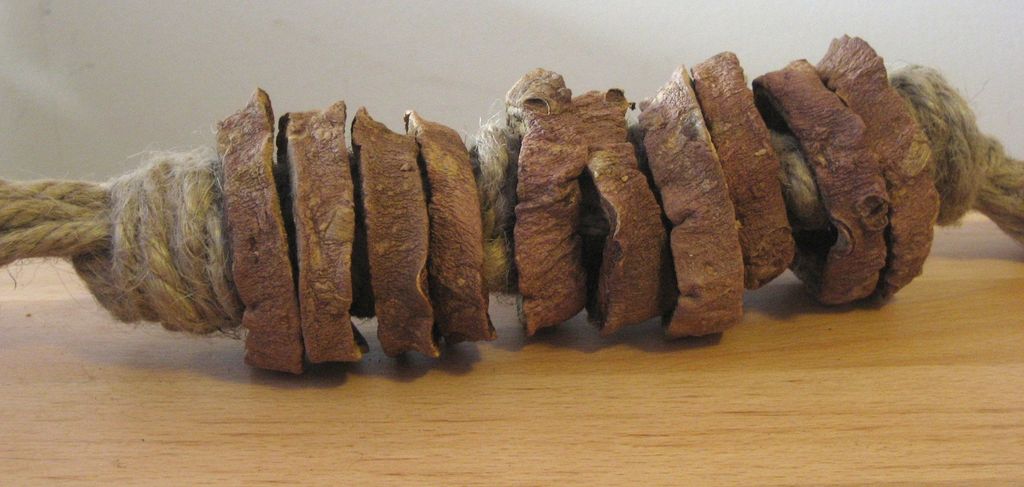
Shesparticular on instructibles.com came up with this idea for a DIY chew toy for her mom’s dog. Her mom’s dog, Molly, loves to play. She says when Molly plays it “usually involves rounding up all her toys and ripping them to shreds.”
In Shesparticular’s pictures of Molly, you can tell she’s a little dog. It may seem surprising, but little dogs can do just as much damage as big ones. So this recipe she’s come up with is pure genius if you want to make strong dog toys that are healthy for your dog.
Here’s what you’ll need and instructions on how to make this toy at home:
- Hemp or jute rope. Nine 2 1/2 foot ropes braided together to make a larger rope works for medium sized dogs. You’ll need to adjust the length of the rope based on your dog’s size.
- Sweet potatoes or yams. One potato for a smaller toy, two for a medium toy and three to four for a larger toy
- Sheet pan and parchment or foil
- A sharp knife
- Round cookie cutter a bit larger than the diameter of your rope
- Vegetable peeler (optional)
Instructions:
- Preheat your oven to 250 degrees Fahrenheit
- Wash your sweet potatoes well. Peeling them isn’t necessary unless you prefer it.
- Slice the sweet potato into rounds approximately 1/2″ thick
- Using the cookie cutter, remove the center of each round
- Place rounds on cookie sheet and bake for 2 1/2 hours then flip them over and bake for another 2 1/2 hours.
- They’re done when they’re dried out and hard. If there are any soft parts, bake them longer and check them every 30 minutes.
- Once they’re done, allow them to cool.

Once your sweet potato rings have cooled, you can start making your toy.
Start by tying a knot at the end of your hemp rope. If you’re using many thinner pieces, braid them together. This will make it easier to string the sweet potato pieces on.
String two potato rings onto your rope then tie a knot in the rope. Continue adding two rings at a time and tying a knot after each pair until you reach the end of the rope.
When you’ve finished, hand this toy over to your dog and watch them chew for hours.
# 2: Knotted Hand Towel Toy

This toy’s so easy to make, even a dog could do it. Taylor Martin from cnet.com came up with this simple way to repurpose old linens and make a great dog toy.
All you have to do is take an old, tattered hand towel and tie a knot in the middle. You can even use a full sized towel and make several knots.
My dog is a Pitbull mix, so though this is a tough toy, he would likely still rip it to shreds. The good news is, it doesn’t cost a cent. So even if it only lasts a few days, you didn’t lose any money on it.
#3: Ring Dog Toy

A user called J3443RY at instructables.com designed this indestructible dog toy. This is just a basic rope knot toy.
If you know how to tie a crown knot, all you need to do is create two lengths of rope by tying 4 lengths of rope in crown knots. All you need to make this toy is some nylon repelling rope.
Here are some step by step instructions for creating this toy
- Cut 4 equal lengths of rope. You can adjust the size of the toy based on the size of your dog. 4 Inches of rope is equal to 1 inch of the finished toy. For example; for a 6 inch finished knot you would need 24 inches of rope to start.
- Use 2 of the 4 ropes to create a 7″ long finished crown knot.
- For step three, the user has included an instructional video. This will help you to combine the two finished knots into one ring.
When you’re finished with this toy, you will have a nearly chew proof dog toy that your dog can enjoy for hours.
For more advice on caring for your dog and other great recipes, visit metroeastrba.com.
Now Check Out Some Cool Doggy Dental Treats
#4: Darla Cook’s Homemade Greenies

Darla Cook is a blogger and a lover of culinary arts. She is a student at The Culinary Institute of America, so you know her recipes must be the best.
Darla’s blog focuses on general cooking and there aren’t many dog recipes on her blog. But I found a pretty great recipe there for homemade Greenies for dogs. She calls these adorable toothbrush shaped treats Franks Breath Brushes.
If you’re a pet owner, you know that Greenies are a great dental treat for your dog, but they’re expensive to buy.
If you want to save money and have more control over what goes into your dog’s treats, make them yourself at home.
Here is Darla’s recipe.
Franks Breath Brushes
Ingredients:
- 3 1/2 brown rice flour plus 2 cups more (rice flour for crunch)
- 1 tablespoon of activated charcoal (I opened 12 capsules for 1 tablespoon.)
- 4Tbsp. Vegetable Oil
- 1 egg
- 1/2 cup packed fresh mint
- 1/2 cup packed fresh Italian parsley
- 1 cup chicken broth
- Liquid chlorophyll (whole foods/health food store)
Instructions:
Preheat over to 400F. Line your baking sheet with parchment paper.
Combine the charcoal with 3 1/2 cups brown rice flour and set it aside.
Put parsley, mint oil and 1/4 cup of broth or water into food processor. Process until chopped, like pesto. Add 3-4 droppers full of chlorophyll. Pulse a few times to mix. Add this green paste to flour mixture and mix well. Beat egg and mix in. Knead adding the rest of water/broth. By this time you should have a sticky dough ball. Flour the work surface and knead dough until an even green color. Divide dough into workable portions and roll out to about 1/4 inch thick. Add flour to the work surface and dough surface as needed to take away stickiness as you work. Cut out with your favorite shapes, and dock with a fork to keep puffiness down. Bake for 25 or 20 minutes. Cool and store in an airtight container in the fridge.

#5 DIY Doggy Breath Mints

I’ve found yet another great dog breath freshening recipe. This recipe, by Clifford Genece at skinnyms.com, has something in common with Darla’s recipe. It doesn’t contain any wheat flour.
It is so important to avoid giving your dog anything that contains wheat flour. Many dogs are allergic to wheat products. It can cause some pretty intense itching and skin irritation.
Rather than using flower at all, this recipe calls for oatmeal. This recipe also calls for eggs. So Clifford even provides advice for people whose dogs are allergic to poultry products.
Here’s Clifford’s simple recipe for these yummy treats.
Ingredients:
- 2 1/2 cups old-fashioned oats
- 1/2 cup fresh parsley, finely chopped
- 1/2 cup fresh mint, finely chopped
- 1 large egg
- 1/4 cup of water, plus 1 teaspoon
- 3 tablespoons coconut oil (unrefined extra-virgin is best)
Directions:
Preheat the oven to 325° F
Add oats to a blender and pulse to a flour like consistency. In a large bowl whisk together diced parsley and mint, egg, water, and oil. Add oat flour and stir to combine. Knead dough a few times then turn out onto a lightly floured surface.
Using your hands or a rolling pin, flatten dough to about 1/8″ thick. Using a cookie cutter or knife cut out approximately 40 (1-inch mints) mints. Place mints about 1/4-inch apart on a parchment lined or non-stick cookie sheet. Bake 35-40 minutes, or until golden and crispy.
Allow mints to cool completely before serving. Store in an airtight container.
Tip: For dogs with allergies to chicken products, substitute one large egg with 1/4 cup unsweetened applesauce.
These are some of my favorite DIY dental treats and dog toys for powerful chewers. These treats and toys are a great way to keep your dog’s jaws strong and breath fresh. Don’t forget to take a look in your dog’s mouth every now and then and make sure their teeth are in good condition.
Description: Dental treats and dog toys for powerful chewers can be expensive, so why not make your own at home? Give these helpful recipes and DIY dog toys a try.
ooOOoo
Don’t know about you but we think this has been a very valuable and useful article from Sarah!
We must do the best for our beloved dogs!

That sweet potato toy is genius! I’m definitely going to give that a try. -Ellie
LikeLike
Well done, Ellie. Do let us know how you get on.
LikeLiked by 1 person
The sweet potato toy was my favorite one of all of them. Good for your dog and fun to make. :]
LikeLiked by 1 person
Great post, I love DIY treats and toys because you can know exactly what went into them 🙂
LikeLike
Laura, that’s a very important aspect of doing this! Have a great weekend.
LikeLiked by 1 person
These are all interesting especially the dog dental treats. Will save this post for when I have the time to give some of these a try..
LikeLike
Yes, it was a great post from Sarah.
LikeLiked by 1 person
What a great way to recycle hand towels! Terrific idea! I’m sure Mags would love one.
LikeLike
Jolly good! Give Mags a hug from us.
LikeLiked by 1 person
Will do, Paul!
LikeLike
Will Jean be baking these doggie treats Paul? or will you be putting on the apron 🙂 lol.. 🙂 Great share Paul and only teasing.. 🙂
LikeLike
I’ll ask Jean that question now!
LikeLiked by 1 person
Jean replied, “No!” 😄
LikeLike
Haha.. I bet she has a spare apron handy for you Paul, 🙂
LikeLike
I would freak out the dogs if they saw me in an apron! (Well that’s my excuse!)
LikeLiked by 1 person
Hahaha… Yes I can see Jean nodding about excuses haha.. 🙂
LikeLike
Stop taking sides with her! 😉
LikeLiked by 1 person
We ladies have to stick together, didn’t you know this is the AGE of the Feminine 🙂 lol 🙂
LikeLike
Wouldn’t argue with that!
LikeLiked by 1 person
😉
LikeLike
Could I just add this: “Related article: 11 Indestructible Dog Balls“
LikeLike
Wow, pretty impressive and creative! I hope you won’t mind me sharing http://bit.ly/MavelPets – for your other dog toy needs.
LikeLike
Reblogged this on Product Reviews and Lifestyle Enrichment.
LikeLike